Verify Inventory for Work Orders
Tier: Premium — Add-on (purchased separately; not bundled by default). Included with the Advanced Inventory add-on: it's unlocked automatically along with it.
Verify Inventory for Work Orders answers one question before a Mixmate goes out: is there enough product on this machine for the jobs it's about to mix? Pick the Mixmate and its Work Orders, and Mixmate lists every product they need, how much the Mixmate has, and how much to add. As you load product, you update the Mixmate's inventory right there.
Open it from the Data tab: tap the Verify Inventory for Work Orders card under Products. If the card shows Subscribe for Access, your subscription doesn't include it yet (see Common Questions).
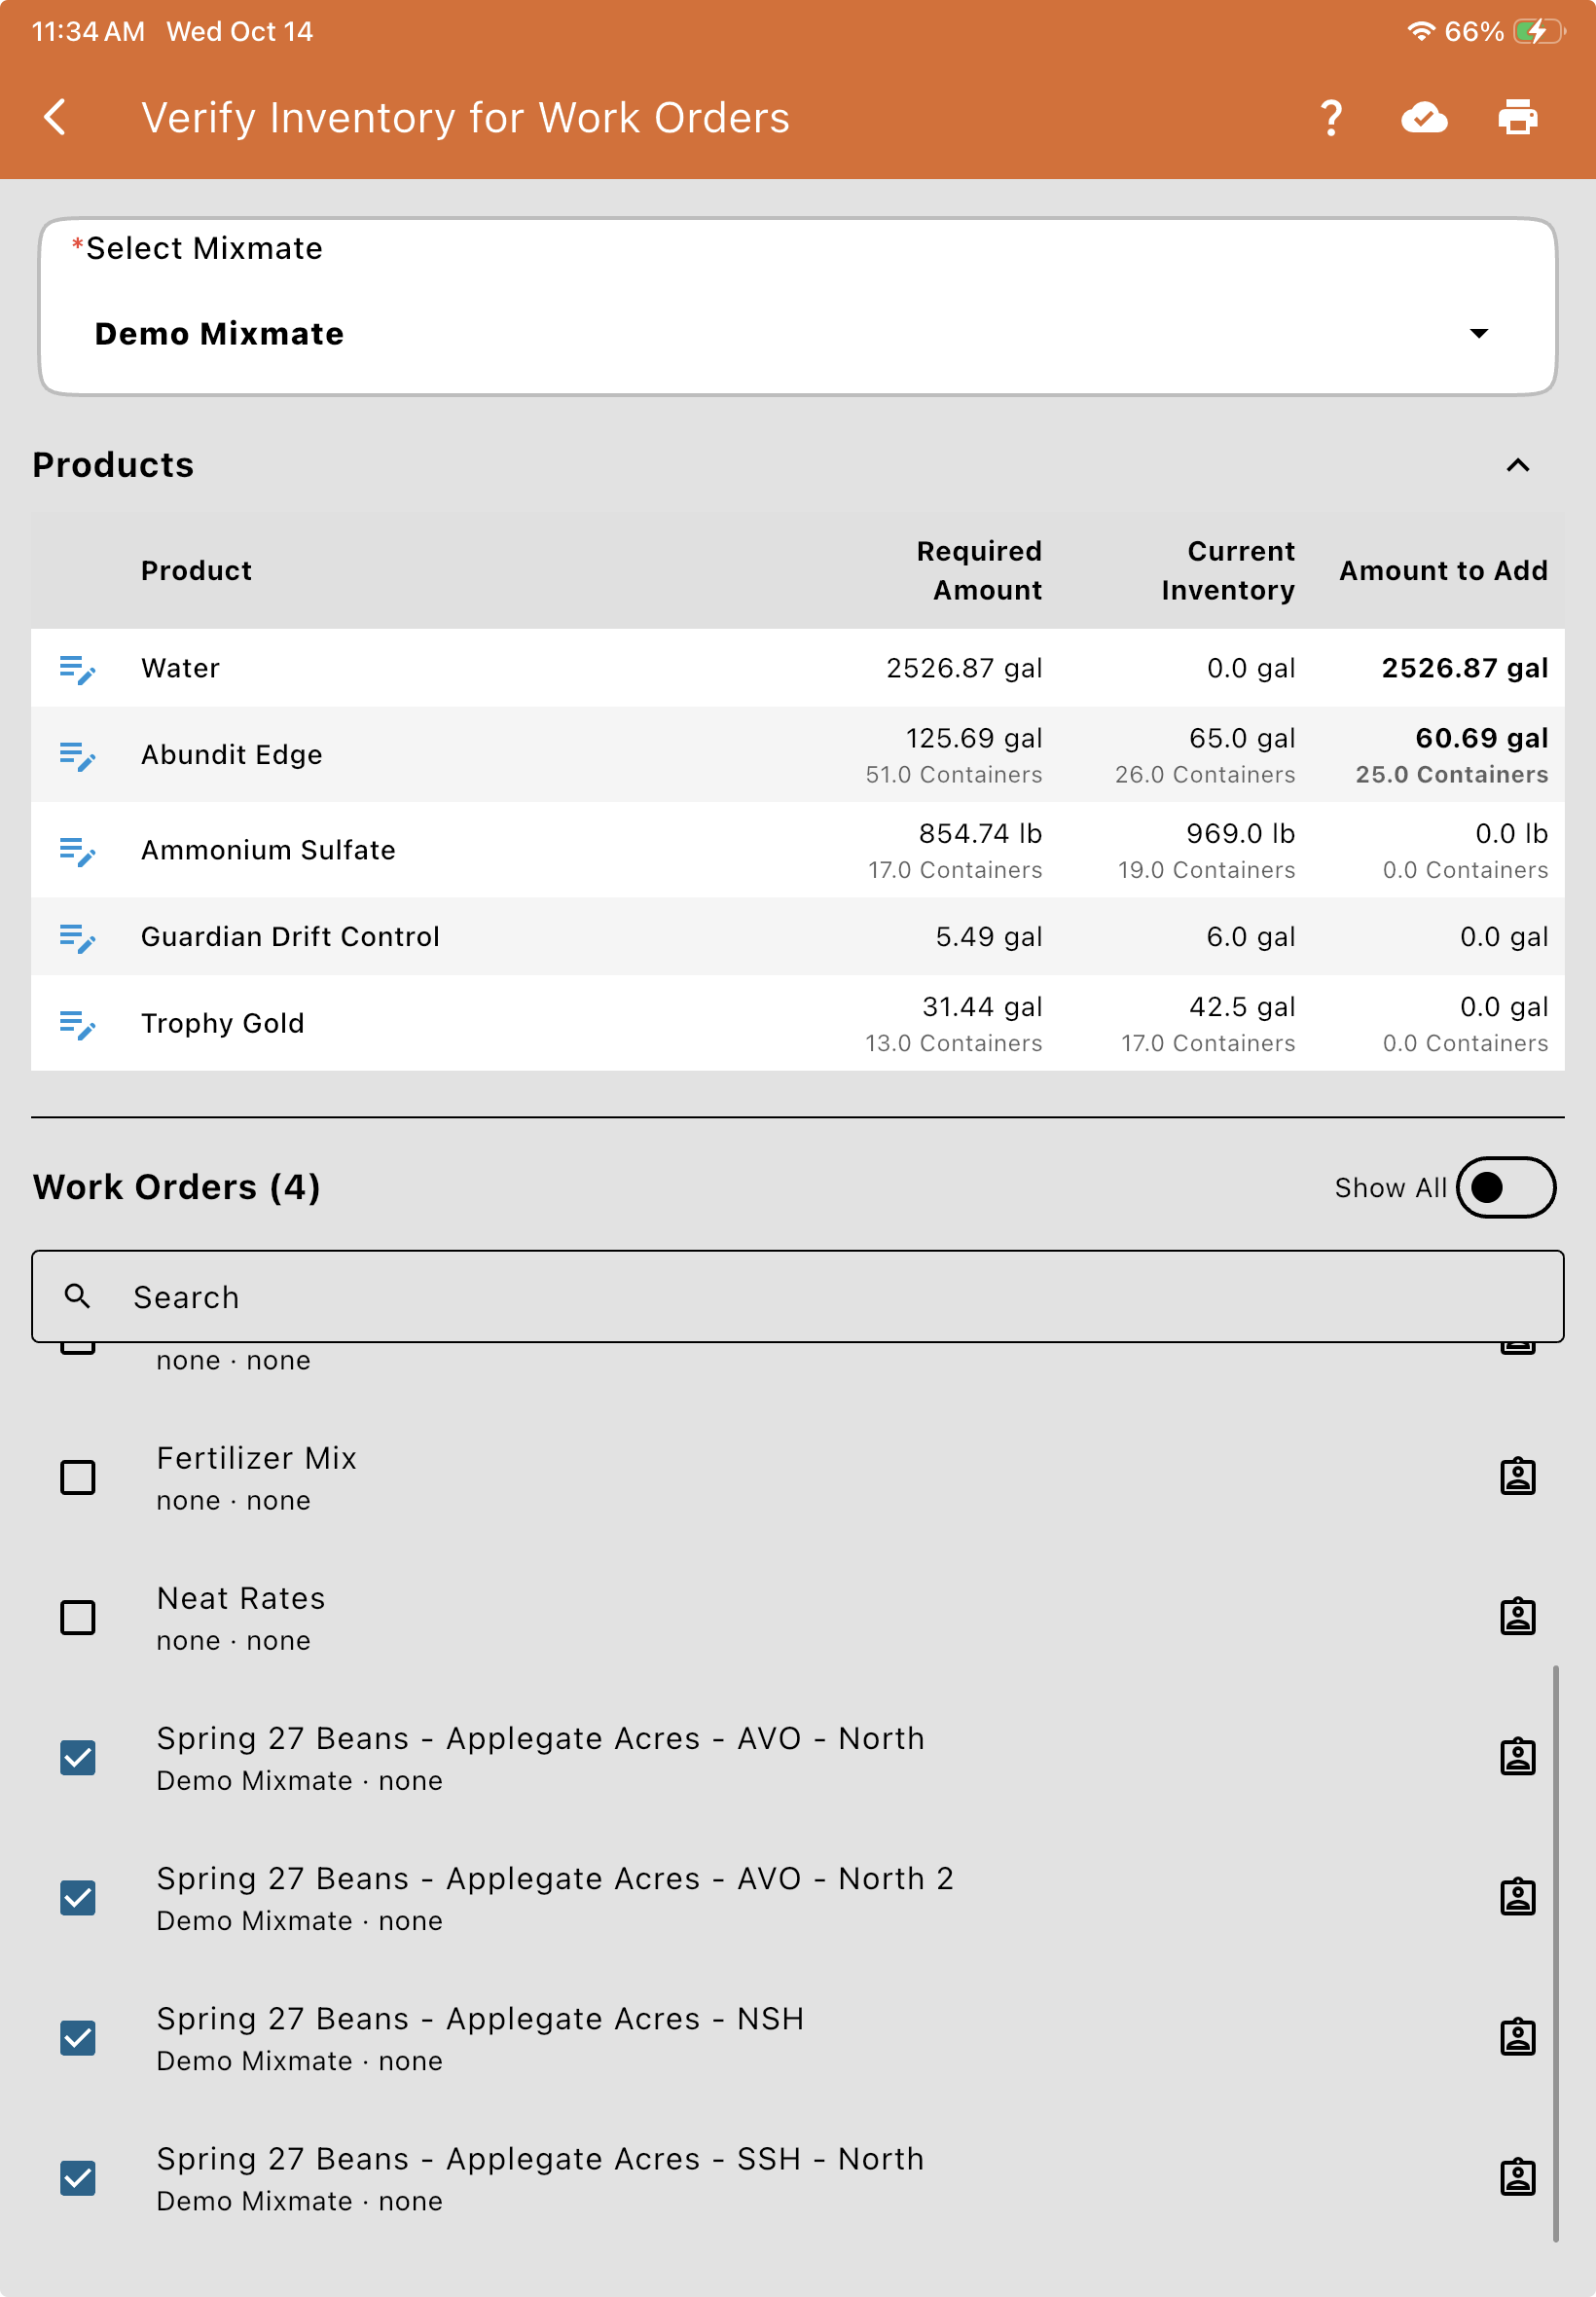
Here's the page in portrait on a tablet: four Spring 27 Beans Work Orders ticked for the Demo Mixmate, and the products they need, with Water and Abundit Edge still to add:
1. Pick the Mixmate
Section titled “1. Pick the Mixmate”Choose the machine in Select Mixmate at the top. It starts on the Mixmate you last mixed with. Everything on the page is for this Mixmate: its Work Orders and its inventory.
2. Choose the Work Orders
Section titled “2. Choose the Work Orders”The Work Orders list starts with the Work Orders for the selected Mixmate and for you (the user signed in), including any that aren't assigned to a Mixmate or user. Each one shows the Mixmate and user it's assigned to underneath, or None.
Tick the Work Orders the machine is going to mix. Those already assigned to this Mixmate start ticked. The heading shows how many are ticked, for example Work Orders (3).
Turn on Show All to see every open Work Order, including those assigned to another Mixmate or another user.
Use the Search box to find a Work Order by number. Ticked Work Orders stay on the list (and stay counted) whatever you search for or filter.
Changing the Mixmate at the top starts the ticks over for that machine.
How much of each Work Order counts: a Work Order (Completable) counts only what's left of it, so a half-finished job counts as half. A Reusable Mix counts as one whole mix each time. Repacks and Templates aren't listed (a Template's fields each have their own Work Order, which is). See Work Order Types.
Assigning Work Orders (Power and Admin Users)
Section titled “Assigning Work Orders (Power and Admin Users)”Power users and Admins see an assign button next to each Work Order. Tap it to open Assign Work Order, choose the Mixmate and the user (Only For User) it's for, or None for either, and tap Save. This is the same assignment as the Applied Mix Filters on the Work Order, so it also decides where the Work Order shows on the Mix tab.
3. Check the Products
Section titled “3. Check the Products”The Products table lists everything the ticked Work Orders need: the carrier first, then each product by name.
| Column | What it shows |
| Required Amount | How much the ticked Work Orders need altogether. |
| Current Inventory | How much is at this Mixmate now (0 if none has been set). |
| Amount to Add | What's still needed: the Required Amount minus the Current Inventory. It's in bold while anything is needed, and 0 once there's enough. |
For products with a Container Size, each amount also shows the number of containers underneath: whole containers for the Required Amount and the Amount to Add, and the exact number (part-used containers included) for the Current Inventory.
4. Update the Inventory
Section titled “4. Update the Inventory”Tap anywhere on a product's row to open Update Inventory. The top shows that product's Required Amount, Current Inventory and Amount to Add.
Add what's needed in one tap: the Add 25 Containers button (or Add 2526.87 gal, for a product without containers, like the carrier) fills in exactly what's still needed. Then tap Save.
Or enter it yourself: choose Amount Added (added to what's there) or New Total (replaces it), type the amount, and pick its unit. You can count in Containers, the product's own unit, or any other unit of the same kind (and of the other kind, volume or weight, for a product with a density).
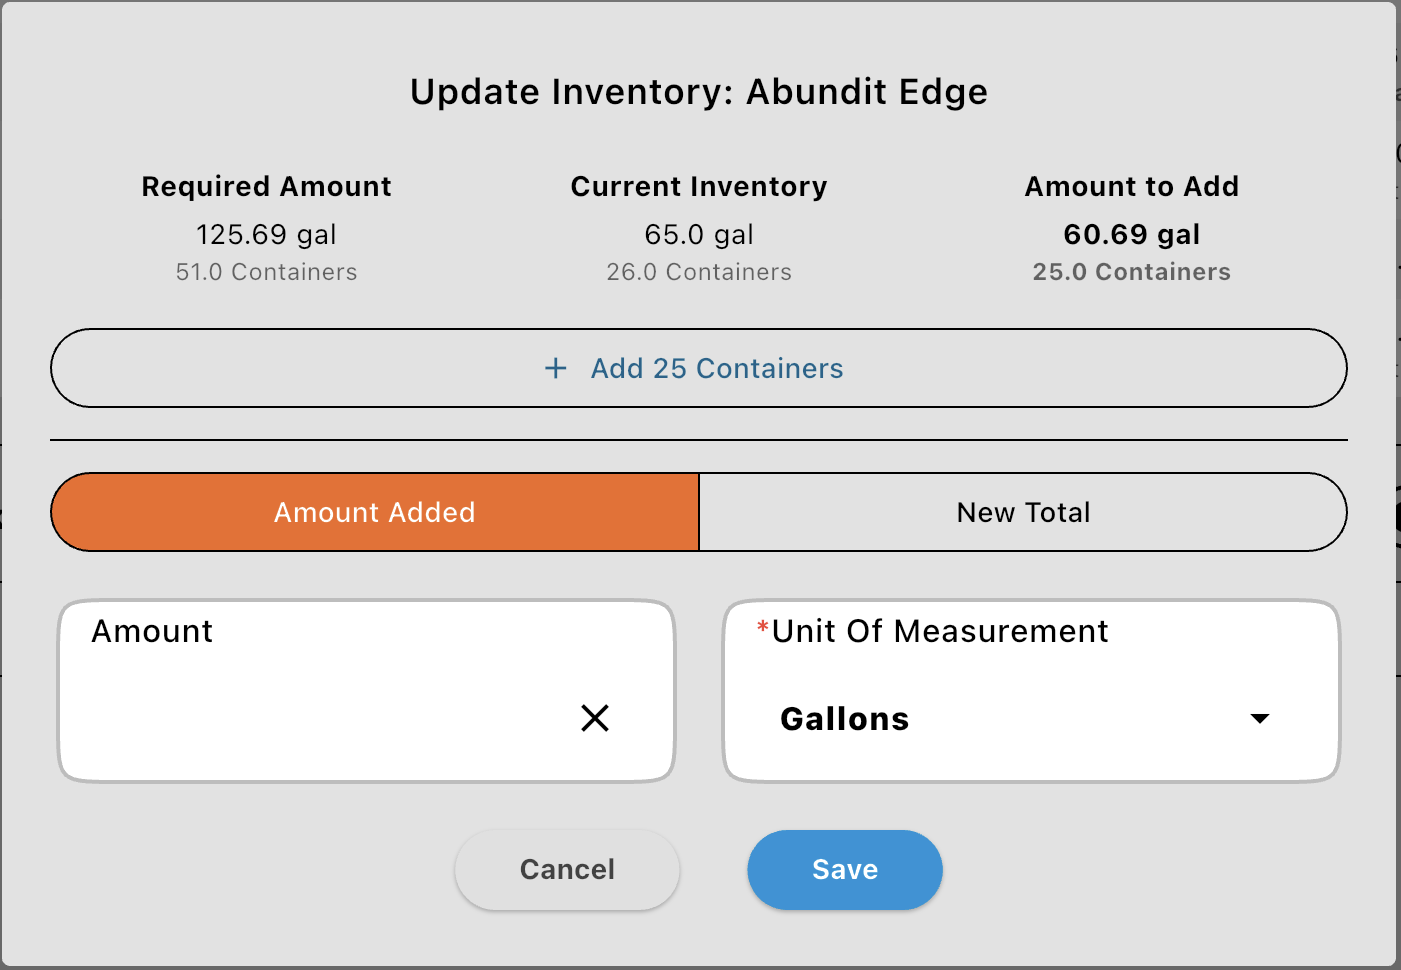
Tap Save, and the Mixmate's inventory is updated right away. The table follows straight away, so you can work down the list as you load.
5. Print a Load Sheet
Section titled “5. Print a Load Sheet”Once at least one Work Order is ticked, a Print button appears at the top of the page. It makes a Load Sheet for the Mixmate: the ticked Work Orders with how much is left of each, and every product with its Required Amount, Current Inventory, Amount to Add, the containers to add, and a blank Loaded column to fill in by hand while loading.
6. On a Tablet or Phone
Section titled “6. On a Tablet or Phone”Tablet in landscape: the Work Orders are on the left and the Products on the right, each scrolling on its own.
Portrait, or a phone: the Products come first and take up to about half the screen, then the Work Orders fill the rest. Tap the arrow next to Products to fold them away for more room while ticking Work Orders. On a narrow screen the Products table also scrolls sideways.
Common Questions
Section titled “Common Questions”A Work Order I expected isn't in the list.
It may be assigned to another Mixmate or user: turn on Show All. Repacks, Templates and completed Work Orders aren't listed.
Why is the Products table empty?
No Work Orders are ticked. Tick the ones this Mixmate will mix.
I can't see the assign button.
Only Power and Admin users can assign Work Orders.
The card says Subscribe for Access.
Verify Inventory for Work Orders is unlocked with Advanced Inventory, a Premium add-on. To add it, sign in to Intersect and update your subscription, then sync the Mixmate app.