Flomec Gear Meters
For the full official spec sheet, see the FLOMEC OM Series Chemical Flow Meter Spec Sheet (PDF).
If you have flow but the tablet isn't registering any volume, it's almost always one of three things: product that never got rinsed out has dried up and is holding the rotors in place, the rotors weren't placed in the housing correctly, or the rotors or axles are physically broken.
- Verify system flow first. Check that inline strainers are clean, that Main/Product/Throttling valves are fully open, and that the pump is actually moving fluid and not just cavitating.
- Check for dried product or debris. If fluid is moving but the meter stays at zero, dried chemical "scabs" or debris may be wedged between the gear teeth, left behind from a rinse that didn't fully clear the meter. Open the housing (see the disassembly steps below) and clean the gears and housing cavity thoroughly.
- Verify gear orientation. If the meter was recently serviced, the rotors may be installed incorrectly. Both gears have two small circular magnets that must face outward toward the faceplate/sensor — if they're "upside down," the sensor can't see them spinning. The gears should mesh in a "T" shape. Before closing the housing, spin the gears with a finger; they should spin freely with very little force.
- Inspect for broken rotors or axles. A cracked rotor "leg" or a broken axle will stop the meter from turning even with good flow — this is almost always caused by liquid remaining inside the gear cavity during freezing weather.
- Reassemble carefully. Tighten the 6 bolts light and firm, in a star pattern. There's no specific torque spec — let the O-ring do the sealing. These are PPS plastic meters: overtightening will strip the threads or crack the housing.
Still not counting? If the gears spin freely, the magnets face out, and nothing is broken but you still get no reading, you may have a failed circuit board or a break in the wiring. Swap the sensor cable with a known working meter nearby to see if the problem follows the cable or stays with the meter.
Tote Amount Doesn't Match What Was Recorded?
If the physical level in your tote doesn't match what the Mixmate recorded, the meter is miscounting rather than failing outright — a different symptom than the "no reading at all" case above.
Air Leaks in the Plumbing (Most Common): An air leak on the suction side pulls air into the pipes rather than leaking chemical out — because the system is under vacuum while running, you won't see it on the ground. The gear meter spins faster when air bubbles pass through it, so the tablet "thinks" more chemical was used than actually was. Inspect all joints, clamps, and seals between the tote and the meter; even a small pinhole or a slightly loose cam-lock is enough to throw off accuracy.
Gear Orientation: A more severe version of the flipped-magnet problem above can cause under-counting instead of a total failure to read — one gear is backwards and one gear is correct, causing only half the flow to read. Because the system thinks it hasn't hit the target yet, it keeps pumping, which can end up doubling the amount of product dispensed.
Debris in the Meter: Small "chunks" or crystallized chemical can partially jam a gear and cause it to skip counts, rather than stopping it outright. Check the filter screen ahead of the meter for anything that bypassed it.
How Often Should I Clean My Filters?
A filter isn't required to run a gear meter, but installing one just ahead of the meter is strongly recommended as a safety factor — debris is the leading cause of gear meter mechanical wear, and a filter is the simplest way to keep it out and prevent "No Flow" errors. FLOMEC's own spec sheet recommends filtration to 200 mesh (75 μm) ahead of the meter.
Recommended Cleaning Intervals:
When Switching Crops: This is the most critical time. Cleaning filters between different crop applications prevents cross-contamination and ensures that any "sludge" or buildup from a specific chemical doesn't react with the next product in the line.
End of Season: Always clean and inspect all screens before winterization. This prevents chemicals from drying and "scabbing" onto the mesh over the winter, which can be very difficult to remove in the spring.
Whenever Flow Slows Down: If you notice your induction speeds are dropping, the filter screen is the first place to look.
The "Better Safe Than Sorry" Rule: Cleaning more often will not hurt. In fact, if you are using high-viscosity products (like Atrazine) or products known to have "chunks" or flakes, checking your filters daily or every few loads can prevent a mid-day breakdown during the heat of the season.
Maintenance Tip: When you have the filter housing open, inspect the screen for any tears or collapses. A damaged screen allows debris to pass through directly into the gear meter, which can lead to expensive repairs or inaccurate metering.
Gear Meter Disassembly
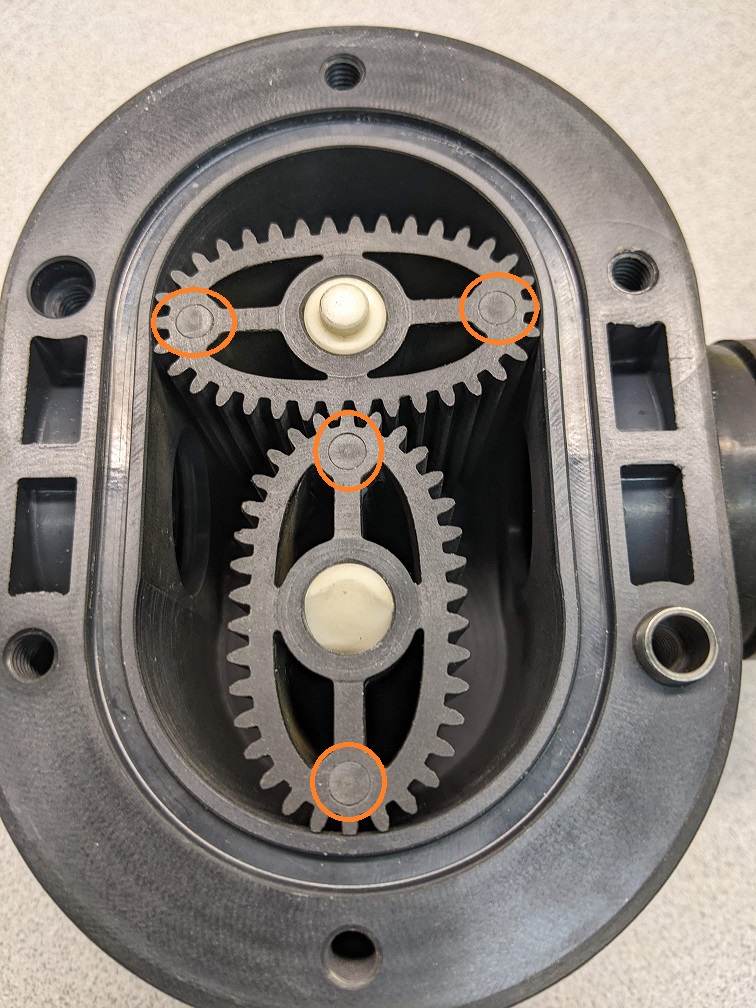
Routine inspection is the best way to ensure accuracy and prevent seasonal damage. If you notice a "stuck" meter or suspect freezing has occurred, follow these steps to safely open and clean the unit.
Disassembly:
- Remove housing bolts: Remove the 6 bolts around the outer edge of the meter housing.
- Remove the faceplate: Carefully pull the face straight off — the gear axles are indexed into the face, with two alignment guides. Do not twist the face while removing it, as this can break the axles or damage the alignment pins.
- Remove the gears: Pull them straight out. If stubborn, use needle-nose pliers to grip and pull them toward you.
- Inspect for damage: Check the gears for cracks, especially where the "legs" connect to the outer portion of the gear — the most common failure point, almost always caused by liquid remaining inside the gear cavity during freezing weather.
- Clean: Thoroughly clean the gears and the interior of the housing while it's open.
Reassembly:
- Place the gears back over the axles in a "T" configuration, magnets facing out.
- Test rotation: put a fingertip on a magnet and spin the gears several full revolutions in both directions to confirm there's no binding.
- Check seals: place the O-ring back into the groove, and confirm both alignment pins are seated.
- Fit the faceplate back on and tighten the bolts in a star sequence (like tire lug nuts), then do a final check-tighten pass in the same sequence.
Warning: These are PPS plastic meters. Overtightening will strip the internal threads — tighten until firm, but do not force them.